Unlocking Clean Water: A Comprehensive Guide to Under Sink Water Filtration
In a world where water quality is of utmost importance, the choice of a water filtration system can significantly impact your daily life. One solution that has gained popularity for its efficiency and convenience is under-sink water filtration. In this blog post, we'll delve into the benefits, installation process, and maintenance tips for under-sink water filtration, providing you with the knowledge to make an informed decision.
Understanding Under Sink Water Filtration
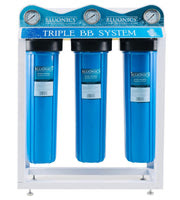
What is Under Sink Water Filtration?
Under-sink water filtration is a compact and effective system installed beneath your kitchen sink to purify tap water before it reaches your faucet. This system employs various filters to remove impurities, contaminants, and odors, ensuring the water you use for drinking and cooking is of the highest quality.
1. Space Efficiency
Traditional water filtration systems may take up valuable counter space, but under sink filtration systems are discreetly tucked away beneath your sink, saving space and maintaining the aesthetics of your kitchen.
2. Continuous Clean Water
Under sink filters provide a constant supply of clean water for drinking and cooking. This ensures that you and your family have access to purified water whenever you need it.
3. Enhanced Taste and Odor Removal
These filtration systems are equipped with advanced filters that not only remove impurities but also improve the taste and odor of your water. Say goodbye to unpleasant chlorine tastes!
4. Cost-Effective Solution
Investing in under sink water filtration is a cost-effective approach in the long run. While there is an initial setup cost, the reduced need for bottled water and the longevity of the filtration system make it an economical choice.
Installation: A DIY Guide
1. Gather Your Tools
Before beginning the installation process, ensure you have the necessary tools: a wrench, tubing cutter, Teflon tape, and a bucket.
2. Turn Off Water Supply
Locate the water shut-off valve under your sink and turn it off. Release any pressure in the line by turning on the faucet.
3. Remove Existing Plumbing
Disconnect the cold water line, and if you have a sprayer, disconnect it too. Remove any existing plumbing attachments.
4. Install the Filtration System
Follow the manufacturer's instructions to install the under-sink filtration system. Typically, this involves connecting the filter to the cold water line and installing a separate faucet for filtered water.
5. Check for Leaks
Tighten connections as needed. Run the system for a few minutes to flush out air and any initial loose particles.
Maintaining Your Under-Sink Water Filtration System
1. Regular Filter Replacements
Follow the manufacturer's guidelines for replacing filters, typically every 6 months to a year.
2. Cleaning the Faucet
Periodically clean the faucet to prevent any buildup of residue or mold. A mixture of vinegar and water is an effective and natural cleaning solution.
3. Professional Check-Up
Consider an annual professional check-up to ensure the entire system is working optimally. A technician can identify any potential issues before they become major problems.
Encouraging Sustainability: Share the Knowledge!
Knowledge is a powerful tool, and by sharing this information on undersink water filtration, you contribute to a community that values clean water. Share this blog post on social media and other platforms to help others make informed choices about their water quality.
Conclusion: Embrace the Purity Beneath Your Sink
Incorporating a Home Water Treatment, such as an under-sink water filtration system, into your home is a step towards a healthier lifestyle. Enjoy the benefits of under-sink access to clean and great-tasting water while saving space in your kitchen. Remember, a little investment in a filtration system goes a long way in safeguarding the well-being of your family.

Comments
Post a Comment